
What We'll Cover:
- Types of Jira workflows
- How Workflows Vary Across Different Jira Project Types
- Fundamental Terms in Jira Workflow
- Steps to create customize workflow
- Jira Templates for Every Team
- Real-life examples (like content publishing and sales tracking)
- Best practices for building workflows that actually work
Workflows represent the steps that are followed in any projects, process or managing tasks. Workflows are an essential part of any department or team. By defining it, the teams define their way of working in a structured manner.
Jira, a widely used project management tool is known for its flexible and customizable workflows. It allows teams to define, manage and optimize their processes according to their unique requirements.
In this article, we will cover the fundamental terms related to Jira workflows, types of workflows, steps to create Jira workflows, best practices and examples of built-in templates designed for various processes such as Sales, Marketing, Software Development, Content Management and more. Jira offers built-in templates for every team, allowing for quicker and easier configuration.

Types of Jira Workflow
Jira workflows can be categorised in two main types.
- Default Workflow – Jira provides ready to use workflows with standard statuses and transitions.
- Custom Workflow – Users can design workflows customized for the specific needs of their organisation or project.
How Jira workflows vary across different project types
Jira workflows are different based on the type of the project.
Team-managed projects
- Workflows are simple and flexible.
- Anyone with product access can easily create and modify workflows without needing admin permissions. Jira Administrators can restrict who can create or edit workflows in Team managed projects.
- They can add or remove statuses and transitions as needed.
Company-managed projects
- Workflows are more controlled and structured.
- Only Jira admins can modify workflows, ensuring consistency across multiple teams. Non-admins with the Edit Workflows permission in company-managed projects can modify workflows, as long as they are not shared with other projects.
- These workflows follow strict rules, making them suitable for larger organizations with standardized processes.
Active and Inactive Workflows
There are two types of workflows based on their association with a project.
- Inactive Workflow – This workflow is not currently in use by any projects. Since no issues are transitioning through it, you can directly modify its steps and transitions. When a new workflow is created from scratch, it remains inactive until it is linked to an issue type or added to a workflow scheme.
- Active Workflow – This workflow is currently being used by projects. When you edit an active workflow, Jira automatically generates a draft version, allowing modifications without affecting the live version. Once changes are finalized, you can publish the draft and optionally save the original workflow as backup.
Fundamental Terms in Jira Workflow
- Status – It is the stage at which an issue is in. For example, issue is in “In Progress”, “In Review” or in “Reopened” stage.
- Transition – It indicates the change of an issue from one stage of a process to another. Examples: “Sent for Review”, “Work Started”, “Work Completed” etc.
- Resolution – It provides details about the completion of the issue.
Explanations of various Jira resolutions are as mentioned below.
- Fixed – The issue has been resolved by implementing a fix, and the solution has been successfully applied.
- Won’t Fix – The team has decided not to fix the issue due to various reasons, such as low priority, lack of resources or it being an acceptable limitation. Details are usually provided while updating in Jira.
- Duplicate – The issue is a duplicate of another existing issue in Jira, meaning it has already been reported and is being tracked elsewhere.
- Cannot Reproduce – The issue could not be reproduced based on the information provided and therefore, no further action can be taken unless more details are given.
- Done – The task or issue has been completed successfully and no further work is needed.
By adding resolution, teams can track and manage issues efficiently by clarifying their status.
- Status Category
Jira provides three status categories that must be selected when defining a new status. These categories help in grouping and organizing statuses for better workflow visualization and reporting.
- To Do: Represents work that has not started yet.
- In Progress: Indicates work that is being worked on.
- Done: It is the completed work that requires no further action.
- Triggers
Triggers allow you to automate workflow transitions based on events in Jira or external tools (like Bitbucket or GitHub). They help in reducing manual efforts.
Example:
Automatically transition an issue from "To Do" to "In Progress" when a developer creates a branch.
Use Case: Automatically transition the issue from "To Do" to "In Progress" when a branch is created for it.
- Conditions
Conditions control who can execute a transition. If a condition is not met, the transition button will not be visible. You can add conditions based on groups, project role, only assignee, only reporter and so on.
Example:
- Only users in the "Developers" group can transition an issue from "To Do" to "In Progress".
- Only the reporter can close the issue.
Use Case: Prevent non-managers from moving an issue to "Approved".
- Validators
Validators validate input before a transition occurs. If validation fails, the transition doesn’t happen and an error message is shown. Users can add validators such as parent status validator, field value changed, date comparison, required field and so on.
Example:
- Make sure the Close issue permission is set before the user transition the issue to "Done" status.
Use Case: Make sure the user performing the transition has a specific permission.
- Post functions
Post functions execute actions after a transition. They can update fields, assign the issue to current user or reporter, add a comment and so on.
Example:
- Assign the issue automatically to the reporter when transitioning to "Reopened".
Use Case: Auto-assign issues on a specific transition.
- Workflow Properties
Properties are key-value pairs that customise the behaviour of a workflow.
Example:
- You might want to prevent an issue from being edited when it reaches a specific status. For instance, once an issue is marked as "Done," you may want to restrict edits to ensure that no data is modified after the work is completed.
jira.issue.editable = true/false
If the value is set to True, edits are allowed; otherwise, they are not.
Steps to Create a Workflow
- Any organisation has its process flow diagram defined. Similarly, for your process, start with the process flow diagram if you have already created one, or brainstorm with the team and create a diagram that covers all the steps, conditions, and everything you can using a tool to draw and visualise a process flow. Discuss with everyone and then convert it to the Jira workflow as explained in the next steps.
- There are two ways to add a new workflow:
- Edit an existing active workflow by copying and renaming it.
- Create a new workflow from scratch.
- Utilise statuses that are available in Jira and add new statuses if required.
- If you are using a workflow that has all the global transitions, it is easy to understand, and any status can move back and forth between other statuses.
- It is also possible to design a customised workflow. For example, a workflow for the SDLC process that includes status for review, allowing transitions back and forth between In Progress and In Review statuses, while all other transitions are restricted to a single direction.
- You can add a screen to a transition, which is helpful for adding more information about the transition.
- You can also edit the workflow in text mode.
- Based on the process flow diagram created, add triggers, conditions, validators, and post functions to fulfil all the process requirements.
- Once a workflow is designed, map it with an issue in a project.
- In Jira, active workflows cannot be edited directly, Jira creates a draft version for modifications. Once finalized, publishing merges the draft with the active workflow. A workflow must be published because changes made to a draft workflow do not take effect until they are published.
- A workflow scheme in Jira is a configuration that maps workflows to specific issue types within a project. It defines which workflow applies to different issue types (e.g., Bugs, Tasks, Stories) in a project.
Jira Templates for Every Team
Jira provides various templates for different business teams – HR, Sales, Marketing etc. We have covered few Jira Workflow examples for various business teams.
Jira Software Simplified Workflow
Scrum templates come with the Software Simplified Workflow by default. This workflow includes global transitions so that all statuses can transition freely to any other status.
The simple workflow is not sufficient to map the processes of each department or team. In that case, a customised workflow can be created.

Real-life examples (like content publishing and sales tracking)
We will cover a few Jira workflow use cases.
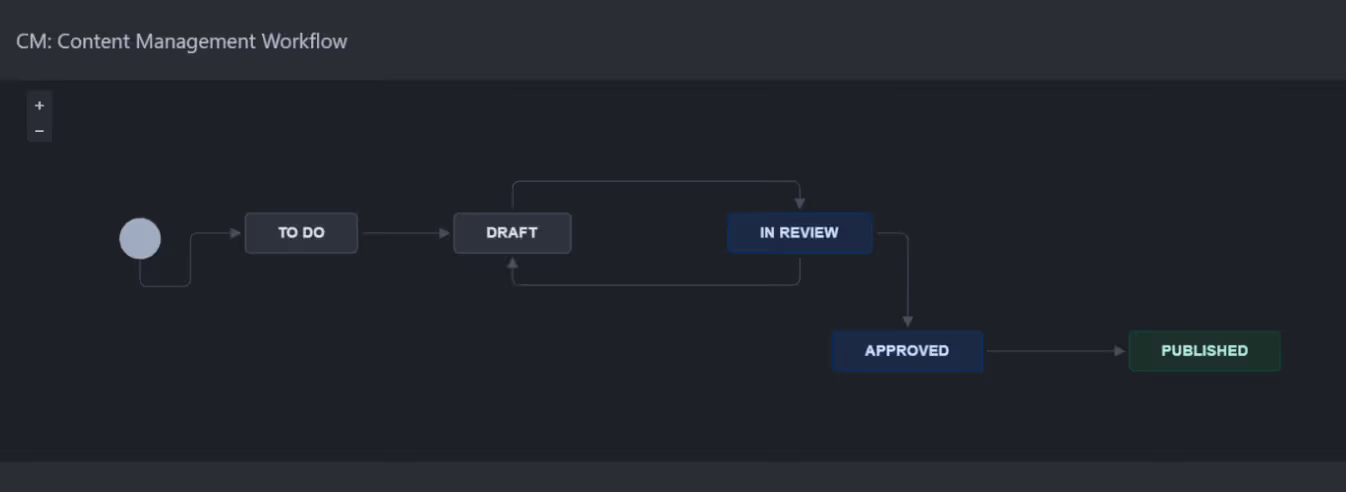
Use Case: Content Publishing Workflow
The diagram below is from a standard Jira template for a Content Management project.
Workflow Steps
- To Do(To Do) : Content idea or request is created.
- Draft(In Progress): Content is being written and structured.
- In Review(In Progress): Content is reviewed by editors or stakeholders.
- Approved(In Progress): Final approval is given for publishing.
- Published(Done): Content is live and accessible to the audience.
Advanced Workflow Features
- Validators: Validate necessary fields (e.g., SEO tags) are completed before moving to "In Review."
- Conditions: Only senior editors can approve content for publishing.
Use Case: Lead Tracking Workflow
The diagram below is from a standard Jira template for a Lead Tracking project.
Workflow Steps:
- Opportunity (To Do) - A new lead is identified and added to the system.
- Contacted (In Progress) - The sales team reaches out to the lead.
- In Negotiation (In Progress) - The lead is interested, and negotiations begin.
- Won (Done) - The lead is successfully converted into a customer.
- Lost (Done) - The lead does not convert.
Advanced Workflow Features
- Validators: Ensure lead details are filled before moving to "Contacted."
- Conditions: Only sales team members can transition leads to "In Negotiation."
Use Case: Event Planning Workflow
The diagram below is from a standard Jira template for a Event Planning project.
Workflow Steps:
- Ideating (To Do) – The team brainstorms ideas for upcoming events.
- Planning (In Progress) – Selected ideas move into the planning phase where logistics, budgeting, scheduling, and resource allocation are handled.
- In Review (In Progress) – Event plans are reviewed by stakeholders or senior management for final approval.
- Done (Done) – The event plan is finalized, approved, and ready for execution.
Best practices for building workflows that actually work
- Keep workflows as simple as possible while ensuring they cover all process steps. Avoid unnecessary statuses and transitions.
- Gather input from all stakeholders before designing a workflow to ensure it is efficiently utilized and not bypassed.
- Modify workflows periodically based on requests, and look for opportunities to simplify them from a Jira Admin perspective.
- If a workflow does not have global transitions, determine whether both forward and reverse transitions are required, and add them after discussing with stakeholders.
- Maintain consistency in workflow naming and structure.
- Test the workflow once it is created. Use a test instance or a separate project to validate new workflows before implementing them in production. Workflows can also be tested using Sandbox (Feature available in Premium and Enterprise versions)
- While testing a new workflow, perform key operations and verify that required fields are populated, rules function correctly, and any necessary error messages appear.
Conclusion
We covered Types of workflows based on types of projects, Components of a workflow, Practical tips to create a Jira workflow, use cases and best practices in this article.
Jira workflows help teams streamline project management processes and increase productivity. By understanding fundamental workflow components, following best practices, and utilizing automation, teams can standardize their processes effectively.
-
Yogita Chhaya is an accomplished Electronics and Communications Engineer with over two decades of experience spanning Telecom, Education, and Training. A Certified Jira Cloud Administrator, author, and dedicated trainer, she specializes in delivering comprehensive Jira training—from foundational concepts to advanced administration. Her mission is to empower professionals to streamline workflows, enhance productivity, and unlock the full potential of Jira.
As a recognized Jira expert, Yogita has also contributed her insights as a guest author on the Getint website, sharing her knowledge to support teams in optimizing their project management processes.